Sunday, August 10, 2014

Java: Generating Sequence Diagrams using jcalltracer

Github Repository : https://github.com/tuxdna/jcalltracer

This post is about getting jcalltracer to work (on ubuntu 12.04, though everything here is pretty general).

I chose it because it works by storing information on disk instead of trying to do everything in memory, so probably scales a little bit better. Also, there wasn't a lot of competition, I couldn't find that many free alternatives. It was simple to use and worked for me.

Clone the repo. Make sure you have all the prerequisites defined on the repo page.

On calling "make" I got an error, "/usr/bin/ld: cannot find -ldb" .
I had to install libdb-dev to get rid of that error.
sudo apt-get install libdb-dev
See bin/test.sh for instructions on how to use. It is self explanatory except for following..

# Run your java program, change filterList to the package name of your interest, once jvm exits, this will produce all the necessary raw information.
java -agentpath:./libjct.so=filterList=com.test,traceFile=calltrace.log -cp test-src com.test.HelloWorld
# generate sequence diagram "tree" in xml files, one per thread
bin/tree.rb
# convert sequence diagram tree to image. personally, instead of using the for loop, you should do a grep on xml files to find threads of interest and just generate images for those threads. you might have to specify more memory using -Xmx for bigger trees
for f in thread-*.xml
do
    java -jar java/dist/calltrace2seq.jar -i $f  -o output/ -f $f
done 
All the sequence diagrams would be now in output/ directory.
I found it very hard to read information from the images for big (really big) call chains. Raw tree xml file is more useful, when opened in a viewer that can display xml as a tree and you can expand/collapse elements, I simply used eclipse to view the xml.

Friday, May 23, 2014

Java SE 8 new features

Just collecting various resources containing updates for java 8. It is a major overhaul and I am so excited with all the new features those are coming especially lambdas, streams and default methods. They will help write so much better and concise code.

Here is a list from Adam L Davis's book referenced below..

- Lambda expressions and Method references

- Default Methods (Defender methods) in interfaces
With this it may seem that Abstract classes are unnecessary, but note that default methods are introduced for interface evolution and Interfaces are still more restricted than Abstract classes due to following.
-- Abstract classes can define constructors while Interfaces can't.
-- Fields inside Interface are always considered public and final, so Interfaces can't have a mutable state.


- Static methods in interfaces

- A new Stream API.

- Optional

- A new Date/Time API.

- Nashorn, the new JavaScript engine

- Removal of the Permanent Generation

References:

What's New in Java 8 by Adam L Davis

Oracle's what's new in Java 8 page

Java 8 Docs

Sunday, June 9, 2013

Chi-Square test of independence

Chi-sq test is used to determine whether two discrete random variables X and Y are independent or not.

I will do it here for binary random variables, but same calculations can be used to figure out independence of general discrete random variables.

Let us define our random variables with an example case for better intuition.
Assume, we have N emails, some of which are spam and some are non-spam. Some emails contain the word "millionaire" and some don't. Our task is to find out whether occurrence of word "millionaire" in an email and that email being a spam are independent of not.
So here is how, we define our random variables.

X = 1 when email contains word "millionaire"
X = 0 when email does not contain word "millionaire"

Y = 1 when email is spam
Y = 0 when email is non-spam

Our task stated earlier reduces to determining whether X and Y are independent or not.

Let us look at the contingency table:

Y=1Y=0
X=1N(1,1)N(1,0)
X=0N(0,1)N(0,0)

Let us define some more notation..
N(x,y) = # of emails for which X = x and Y = y in the given N emails
for example N(1,1) is the number of emails that contain the word "millionaire" *and* are spam.

Also, E(x,y) = *expected* # of emails for which X = x and Y = y
clearly, E(x,y) = P(X=x,Y=y).N

Let say, our hypothesis is that X and Y are indeed independent. Formally, in hypothesis testing lingo, we say null hypothesis, H0: X and Y are independent.
So, assuming that null hypothesis is true

E(x,y) = P(X=x,Y=y).N = P(X=x).P(Y=y).N

estimate P(X=x) = [N(X=x,Y=1) + N(X=x,Y=0)]/N

P(Y=y) = [N(X=1,Y=y) + N(X=0,Y=y)]/N

So E(x,y) =  ([N(X=x,Y=1) + N(X=x,Y=0)] * [N(X=1,Y=y) + N(X=0,Y=y)])/N

Now the magic formula, chi-sq-value =


Magical thing about above formula is that it follows Chi-sq distribution with 1-degrees of freedom [In general if X could take I different values and Y could take J different values then it would be Chi-sq distribution with (I-1).(J-1) degrees of freedom]. I am not proving this fact in this post, and hence called it magical.
However, magic aside, intuitively speaking, it is a measure of discrepancy between expected values in the contingency table and actually observed values.

Now, using chi-sq distribution table, we compute the p-value which is probability of observing given chi-sq-value or greater in a random sample of N emails given that null hypothesis is true. There are 2 possibilities.

p-value is too low (say less than 0.001), it means null hypothesis should be rejected, that is, X and Y are dependent.

Or else, null hypothesis can be considered true, that is, X and Y are independent.

Essential information theory [For ML]

These are mostly my notes from reading of information theory section from Machine Learning : A Probabilistic Perspective.

Entropy: Entropy is the measurement of "uncertainity" in a random variable X. And, is given by


To gain some intuition, let us consider the Bernoulli random variable.
P(X = 1) = p
P(X = 0) = 1-p
H(X) = - P(1)Log(P(1)) - P(0)Log(P(0))
H(X) = - pLog(p) - (1-p)Log(1-p)  [also called binary entropy function]

Here is what it's graph looks like(taken from book)..


It is clear that entropy aka uncertainty is maximum when p = 0.5 (or the distribution is uniform in general), which is in agreement with intuition that you are in no position to guess an event when the probability of it happening is exactly same as each other event in consideration.

Also, negative of entropy is called "Information" which is in some sense an opposite of "uncertainty".

KL Divergence: It is a measure of divergence or "dissimilarity" between two probability distributions, say p and q. And, is given by

It can be proved that KL is always greater than or equal to 0. And, KL = 0 iff p = q.
Clearly, higher the KL divergence implies higher dissimilarity between two probability distributions.

Mutual Information(MI): Mutual information is a measure of degree of "correlation" between two random variables X and Y. It is obtained by finding the dissimilarity between P(X,Y) and P(X)P(Y), which is KL divergence.
So, MI, I(X,Y) = KL(P(X,Y) || P(X)P(Y))
  

I(X,Y) = 0 means X and Y are essentially the same and higher MI means higher dissimilarity and hence higher correlation.

It can be easily derived that
I(X,Y) = H(X) - H(X|Y) = H(Y) - H(Y|X)
where H(X|Y) is "conditional entropy" of X given Y, and is given by

H(X|Y) can be interpreted as uncertainty in X after observing Y. So
I(X,Y) = H(X) - H(X|Y) gives us another interpretation of MI, that is, reduction in uncertainty of X after observing Y.

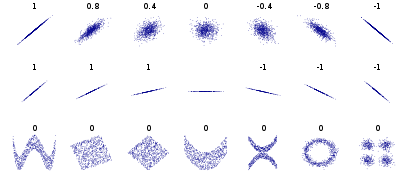
Another question is that why Pearson's correlation coefficient is not a good enough measurement of correlation. It turns out that correlation coefficient fails terribly on capturing many kind of relationships as is evident in following figure (taken from wikipedia)


Fig: Several sets of (x, y) points, with the correlation coefficient of x and y for each set. Note that the correlation reflects the non-linearity and direction of a linear relationship (top row), but not the slope of that relationship (middle), nor many aspects of nonlinear relationships (bottom).


Thursday, January 24, 2013

Good Unit Tests

Found a good thread on stackoverflow regarding the good unit tests : http://stackoverflow.com/questions/61400/what-makes-a-good-unit-test

 Pasting the most important ans from above thread here..
--------------------------------------------------
Good Tests should be A TRIP (The acronymn isn't sticky enough - I have a printout of the cheatsheet in the book that I had to pull out to make sure I got this right..)
  • Automatic : Invoking of tests as well as checking results for PASS/FAIL should be automatic
  • Thorough: Coverage; Although bugs tend to cluster around certain regions in the code, ensure that you test all key paths and scenarios.. Use tools if you must to know untested regions
  • Repeatable: Tests should produce the same results each time.. every time. Tests should not rely on uncontrollable params.
  • Independent: Very important.
    • Tests should test only one thing at a time. Multiple assertions are okay as long as they are all testing one feature/behavior. When a test fails, it should pinpoint the location of the problem.
    • Tests should not rely on each other - Isolated. No assumptions about order of test execution. Ensure 'clean slate' before each test by using setup/teardown appropriately
  • Professional: In the long run you'll have as much test code as production (if not more), therefore follow the same standard of good-design for your test code. Well factored methods-classes with intention-revealing names, No duplication, tests with good names, etc.
  • Good tests also run Fast. any test that takes over half a second to run.. needs to be worked upon. The longer the test suite takes for a run.. the less frequently it will be run. The more changes the dev will try to sneak between runs.. if anything breaks.. it will take longer to figure out which change was the culprit.
  • Readable : This can be considered part of Professional - however it can't be stressed enough. An acid test would be to find someone who isn't part of your team and asking him/her to figure out the behavior under test within a couple of minutes. Tests need to be maintained just like production code - so make it easy to read even if it takes more effort. Tests should be symmetric (follow a pattern) and concise (test one behavior at a time). Use a consistent naming convention (e.g. the TestDox style). Avoid cluttering the test with "incidental details".. become a minimalist.
Apart from these, most of the others are guidelines that cut down on low-benefit work: e.g. 'Don't test code that you don't own' (e.g. third-party DLLs). Don't go about testing getters and setters. Keep an eye on cost-to-benefit ratio or defect probability.
-----------------------------------------------

Some of my own from experience(not strict rules that I follow but just guidelines)..

- Whenever writing tests, keep in mind, how much the test code changes if you change the implementation(keeping the interface same) of your method under test. In short, try to test specification as much possible.

- Recently, to abstract away a key-value store, I created an interface, KeyValueDb. In addition to the real key-value store based implementation I wrote another one which is backed by memory. All the code that uses KeyValueDb, I used memory-backed implementation in the unit tests and surprisingly tests look much cleaner than using mock(KeyValueDb). However, mocks are required in some places to create scenarios hard to create otherwise(e.g. socket timeout).

Also, though I don't do T.D.D.[neither Design nor Development], but writing unit tests while/after I am done coding something gives me confidence that it works. It sure helps catch bugs and sometimes results in good method level refactorings .

Not tired of reading yet? Here is another intersting post... http://mike-bland.com/2012/07/10/test-mercenaries.html .


Sunday, November 11, 2012

linux cmd cheats


#to look at traffic at port 80, in ascii format(-A), snaplen unlimited(-s 0)
tcpdump -i any -s  0 -A tcp port 80

#randomly select N lines from
shuf -n N input > output

#removing/selecting non-ascii chars
sed  's/[\d128-\d255]//' input_file
grep -P '[\x80-\xFF]' input_file

# Printing control character on shell (for example to use as delimiter in cut command)
Type Ctrl-v and then Ctrl-a will print ^A

# cat -n prints line numbers as well

//Note that cut command does not order the fields even if you say -f2,1 .They will still be printed in the order they appear in the input file. You can use awk for that
# cat data
1,2
3,4

# cut -d ',' -f2,1 data
1,2
3,4

# awk 'BEGIN { FS = "," } { print \$2,\$1}' data
2 1
4 3
 

#pretty-print jsonecho '{"a":1,"b":2}' | python -mjson.tool

# Redirect stderr to stdout and stdout to a filefoo > log_file 2>&1


#convert seconds since epoch to date string
date -d @1396324799


Monday, October 29, 2012

confidence interval - a interpretation

Given a population sample..

(X_Bar - mu)/(S/sqrt(n)) ~ t distribution with n-1 degrees of freedom

this fact is used to derive the (1-alpha)100% confidence interval for population mean(mu) which is..

X_Bar +/- (S/sqrt(n))t_n-1_1-alpha/2

where t_n-1_1-alpha/2 is (1-alpha/2)th quantile of t-distribution with n-1 degrees of freedom.

Note that this interval is random that is if you take multiple samples with same sample size then the value of this interval will most likely be different for different samples from the same population. However, the true population mean(mu) has a fixed value.

One interpretation of confidence interval is that if you take multiple samples and find some confidence interval, say 95% confidence interval, from all the samples then 95% of the time mu will lie inside those intervals.

Wednesday, September 19, 2012

stats1-coursera-week2-notes

Given sample data of two random variables X and Y, When is the correlation analysis between then valid?
1. X and Y, both, have normal distribution because to do correlation analysis you need data points from all the spectrum of values possible. For example if all your X values in the sample are close to a single value let say 0(whereas possible values of X are from let say -500 to +500) then no matter how big the sample is, you are not going to get any meaningful correlation analysis results.
How to see: Just draw histogram of the sample and see if it is close to bell curve. Also, see summary statistics for the samples.

2. X and Y have linear relationship.
How to see: Examine the scatterplot of Y vs X, Plot the histogram of residuals(prediction error from linear model)

3. Homoskedasticity
How to see: Plot residuals vs X values. there should be no relationship, it should be random

Reliability of the correlation coefficient?
One approach is to use null hypothesis significance testing. For example H0 is that there is no correlation. Find the p-value and accept/reject null hypothesis. You can also look at the confidence interval for correlation coefficient.

 Notes on Sampling
In most of the statistical experiments, it is not possible to gather data from whole population and you gather data from a "random representative sample" which is "large enough" to give decent estimation of parameters.
So, there will be a difference between the actual population parameter(say mean) and same measured from the sample. The difference is called the sample error. Now, mostly, we don't know the actual population parameter value(in this case the true mean in the population).. so how do we estimate what our sample error is(btw estimate of sample error is called standard error, SE)?
SE of estimated mean =  SD/sqrt(N)
where SD is standard deviation of the sample.
But, how is above formula obtained?

let say we take many many samples from the population and find the mean value from each of the samples, then these estimated mean values will be possibly different for different samples. Essentially, estimated means coming from different samples have a probability distribution(you can get some idea of this distribution by plotting the histogram, called probability histogram, of all the different sample means), which is called distribution of the sample mean and mean of the distribution of sample means is equal to true mean of the population. Also, SE is the standard deviation of probability histogram.

By "central limit theorem", the fact is that distribution of the sample mean has to be normal as long as sample sizes are large enough(N > 30) or if the random variable in question is normally distributed.

Notes on Hypothesis testing(taking sample mean as an example):
p-value = P(sample-data-observed | H0 is true)
which in simple terms means, the probability of observing given sample or more extreme than that given the null hypothesis is true. Hecne, if p-value is low(e.g. less than a threshold) then we can reject the null hypothesis.

Usually, the approximate probability distribution of  observed-sample-data given H0 is known(sample distribution). And, using that probability distribution we calculate the p-value.

For example, sample distribution of the mean has normal distribution. That says..
(X_bar - mu)/(sigma/sqrt(n)) ~ standard normal distribution(Z)

where
X_bar : sample mean
mu : true population mean
sigma : true population standard deviation
n : sample size

Let say H0 is that true population mean(mu) is 0 then
z-score = (X_bar - 0)/(sigma/sqrt(n))

which is basically how many standard deviation away are you from the true mean. If absolute value of z-score is too much then that means assumed H0 is not true and should be rejected.

Now, let us try to understand how z-score(in general the test-statistic) and p-value are related. To, understand that let us see the standard normal distribution.


It is clear from the picture above that if H0 is true then with 95.4% chance we should get a absolute z-score less than 2(in fact [-2*(sigma/sqrt(n),+2*(sigma/sqrt(n)] is called 95.4% confidence interval for the true population mean).
And with 4.6%(= 100 - 95.4) we observe a sample such that z-score is not in [-2,+2]. So, the probability of observing this sample data or more extreme is 0.046 and that is our p-value.

Since we are talking about sample mean, so one more thing worth mentioning is that, usually sigma is not known and we approximate that by square root of MSS(mean sum of square deviation). Sample mean distribution will still be approximately normal as long as sample size is large otherwise the sample mean distribution will be more close to t distribution with n-1 degrees of freedom and we will use t-score instead of z-score and p-value/confidence-interval etc will be calculated from t-distribution.


Monday, September 3, 2012

ad hoc jvm monitoring and debugging

Many a times we notice some issue in production environments and quickly need to investigate the details with ssh connection to a terminal. jdk comes packaged with some very useful tools to monitor/debug jvm which can come in handy..

jps - lists the vm-id's of instrumented jvm processes running on the machine

jinfo - gives you a lot of detail about the configuration a jvm process was started with(which, otherwise, is scattered around innumerable number of configuration files and environment variables)

jstat - a jvm monitoring tool, very quick to setup. it can basically monitor the heap, gc frequencies and time elasped doing gc. It can be setup with one command e.g. "jstat -gcold -t vm-id 10s"

jstack - this lets you print the stack trace of all the threads. it can automatically find out the deadlocks. Also, you can find high contention locks by taking multiple thread dumps over a small period of time and see which locks are being waited upon most frequently. Use "jstack -F -m vm-id". Use additional "-l" option to print lock information (it will be slow though).

jmap - basically the heap analyzer. among other things, you can use it to dump the contents of heap to a file(e.g. jmap -dump:format=b,file=mydump.hprof vm-id). you can use jhat to explore this file using a browser or use eclipse-mat that gives better ui and functionality.

hprof -  standard java cpu/memory profiler bundled with jdk. this is not really ad-hoc as you would have to add it to jvm options at start up instead of just attaching at will. output can be processed via jhat and other fancy tools such as yourkit.
java -agentlib:hprof=help
java -agentlib:hprof=heap=sites,cpu=samples,depth=10,monitor=y,thread=y,doe=y,format=b,file=/home/himanshu/profile_dump.hprof

http://www.javaworld.com/article/2075884/core-java/diagnose-common-runtime-problems-with-hprof.html
http://docs.oracle.com/javase/8/docs/technotes/samples/hprof.html

Note that, when the jvm process is started by a different user than the one you are logged in with, your logged-in user might not have permissions to attach to the jvm process and you may need to use sudo with all of the above commands.

Btw, these tools are not limited to jvm processes running locally but can be used with remove jvm processes as well using rmi. In this case you could use graphical clients JConsole and JVisualVM also.

A bit orthogonal to jvm monitoring, but following are some noted jvm startup options that are very helpful when things go wrong.

-XX:ErrorFile=/path/to/hs_err_pid.log
If an error occurs, save the error data to given file.

-XX:-HeapDumpOnOutOfMemoryError
-XX:HeapDumpPath=/path/to/java_pid.hprof
Dump the heap to given file in case of out of memory error.

-XX:-PrintGCDetails
-Xloggc:/path/to/gclog.log
Prints useful information about gc in given file. you can use gcviewer to analyze this file.

References:
http://docs.oracle.com/javase/8/docs/technotes/tools/
http://www.oracle.com/technetwork/java/javase/tech/vmoptions-jsp-140102.html
http://docs.oracle.com/javase/8/docs/technotes/tools/windows/java.html


Sunday, September 2, 2012

Dynamic Proxies in Java

Java Proxy class in reflection package lets you dynamically create a proxy class(and its instances) that implements interfaces of your choice. Proxy instance contains a InvocationHandler supplied by you. Any method calls to the proxy instance call the handle method of passed invocation handler where you can determine the behavior that you want on the call.
So, for example, you can very easily wrap around implementation of an interface and do some magic before/after the method invocation(and much more of course). Using this you can get lightweight "aop" like functionality for method interception.

A much more informative article on the same topic is http://www.ibm.com/developerworks/java/library/j-jtp08305/index.html

Saturday, September 1, 2012

Java SE 7 new features

JDK7 has got many new features and folks have done a great job of writing good articles about all of them, so I wouldn't repeat any of that.
For my quick access, I will keep a reference to many such articles and a quick list of interesting features.

- Type inferencing for generic instance creation
- Strings in switch statements
- try-with-resources and using exception suppression instead of masking it
- Catching multiple exceptions in single catch block
- NIO 2.0 changes
- Fork-Join paradigm

References:
Good article on try-with-resources and exception suppression
http://www.oracle.com/technetwork/articles/java/trywithresources-401775.html

Fork-Join article
http://www.cs.washington.edu/homes/djg/teachingMaterials/spac/grossmanSPAC_forkJoinFramework.html
 http://stackoverflow.com/questions/7926864/how-is-the-fork-join-framework-better-than-a-thread-pool

Misc
http://radar.oreilly.com/2011/09/java7-features.html


Saturday, August 25, 2012

jvmstat code demo

In last post, I showed how you can connect to a locally running jvm's jmx agent using java attach api and get various monitoring statistics from the in built jmx beans. In addition to jmx beans, you can gather similar information from jvm using the sun.jvmstat.monitor pacakge.

import sun.jvmstat.monitor.Monitor;
import sun.jvmstat.monitor.MonitoredHost;
import sun.jvmstat.monitor.MonitoredVm;
import sun.jvmstat.monitor.VmIdentifier;

/**
 * This example demonstrates the usage of sun jvmstat package to connect to a jvm
 * running locally(given the vm id obtained using jps command) and print out the
 * count of live threads.
 * 
 * You have to add $(jdk-home)/lib/tools.jar in your class path to compile/run
 * this code.
 *
 * @author Himanshu Gupta
 */
public class JvmStatDemo {

    public static void main(String[] args) throws Exception {
        String id = args[0];
        VmIdentifier vmId = new VmIdentifier(id);
        MonitoredHost monitoredHost = MonitoredHost.getMonitoredHost(vmId);
        MonitoredVm monitoredVm = monitoredHost.getMonitoredVm(vmId, 5);
        Monitor m = monitoredVm.findByName("java.threads.live");
        System.out.println("Number of live threads = " + m.getValue());
        
        //You can print whole list of monitored stuff
        /* List logged = monitoredVm.findByPattern(".*");
        for(Iterator i = logged.iterator(); i.hasNext(); ) {
            m = i.next();
            System.out.println(m.getName() + " : " + m.getValue());
        } */
    }
}
 
Jstat uses above mechanism to give locally running jvm monitoring information.

Java Attach Api demo

This is a quick demo of Java Attach Api . Jvm comes instrumented with many very useful monitoring jmx beans. In this example, given the vm id(that can be quickly obtained using jps command, in fact attach api can be used to list all the jvm processes running too), We get a proxy instance of ThreadMXBean and print the count of live threads.
import java.lang.management.ManagementFactory;
import java.lang.management.ThreadMXBean;

import javax.management.MBeanServerConnection;
import javax.management.ObjectInstance;
import javax.management.ObjectName;
import javax.management.remote.JMXConnector;
import javax.management.remote.JMXConnectorFactory;
import javax.management.remote.JMXServiceURL;

import com.sun.tools.attach.VirtualMachine;

/**
 * This example demonstrates the usage of java attach api to connect to a jvm
 * running locally, gets handle to ThreadMXBean proxy and prints the count
 * of live threads.
 * You have to add $(jdk-home)/lib/tools.jar in your class path to compile/run
 * this code.
 *
 * @author Himanshu Gupta
 */
public class JmxWithAttachApiDemo {

    public static void main(String[] args) throws Exception {
        String vmid = args[0];
        VirtualMachine vm = null;
        try {
            vm = VirtualMachine.attach(vmid);
        } catch(Exception e) {
            System.out.println("Failed: could not find/attach vm with id: " + vmid);
            e.printStackTrace();
            System.exit(1);
        }
        
        JMXConnector jmxConn = null;
        try {
            String connectorAddress = vm.getAgentProperties()
                    .getProperty("com.sun.management.jmxremote.localConnectorAddress");
            if(connectorAddress == null) {
                System.out.println("Failed: jmx agent does not seem to be running.");
                System.exit(2);
            }
            
            JMXServiceURL url = new JMXServiceURL(connectorAddress);
            jmxConn = JMXConnectorFactory.connect(url);
            
            MBeanServerConnection mbs = jmxConn.getMBeanServerConnection();
            if(mbs == null) {
                System.out.println("Failed: could not get mbean server connection.");
                System.exit(3);
            }
    
            ObjectName on = new ObjectName("java.lang:type=Threading");
            ObjectInstance oi = mbs.getObjectInstance(on);
            ThreadMXBean bean = ManagementFactory.newPlatformMXBeanProxy(mbs,
                    "java.lang:type=Threading", ThreadMXBean.class);
            if(bean == null) {
                System.out.println("Failed: could not get threading mbean.");
                System.exit(4);
            }
            
            System.out.println("Number of live threads = " + bean.getThreadCount());
            System.exit(0);
        } finally {
            if(vm != null)
                vm.detach();
            
            if(jmxConn != null)
                jmxConn.close();
        }
    }
}

This can be used to build jvm monitoring tools and indeed,   JConsole and JVisualVM work this way.


References:
http://docs.oracle.com/javase/7/docs/technotes/tools/
http://docs.oracle.com/javase/7/docs/technotes/guides/management/toc.html

Tuesday, August 21, 2012

Lexical analyzer for COOL

Recently I finished the coursera compiler course where we wrote a fully functional COOL language compiler as part of course work( some related posts).
Because the course encouraged and also the time pressure was there, at the time I had used jlex lexical analyzer generator to generate the lexer. It was a good learning to describe your token specification completely in terms of regexes and let the generator do its magic.
But, often times, I have read/heard that most of the production compilers don't use any lexer generators and lexers are hand coded. So, I also wanted to hand code the COOL lexer. Since, having written the COOL lexer spec for jlex, I understood the details already and it took a bit more than a day to handcode it.

Here it is and I guess it is simple enough to follow for anyone to understand(Also, lexical structure of COOL can be found in section-10 in the manual)...

package info.himanshug.coolc;

import info.himanshug.coolc.provided.AbstractTable;
import info.himanshug.coolc.provided.TokenConstants;

import java.io.BufferedReader;
import java.io.FileReader;
import java.io.IOException;
import java.util.HashMap;
import java.util.Map;

public class HandCodedCoolLexer {

 private String fileName; //source code file name
 private BufferedReader stream; //stream of characters
 
 private int currLineNo = 1;

 //all COOL keywords and their token constant map
 private Map keywordsTokenConstants = new HashMap();
 
 public HandCodedCoolLexer(FileReader stream, String fileName) {
  this.stream = new BufferedReader(stream);
  this.fileName = fileName;
  
  keywordsTokenConstants.put("class", TokenConstants.CLASS);
  keywordsTokenConstants.put("else",TokenConstants.ELSE);
  keywordsTokenConstants.put("fi",TokenConstants.FI);
  keywordsTokenConstants.put("if",TokenConstants.IF);
  keywordsTokenConstants.put("in",TokenConstants.IN);
  keywordsTokenConstants.put("inherits",TokenConstants.INHERITS);
  keywordsTokenConstants.put("isvoid",TokenConstants.ISVOID);
  keywordsTokenConstants.put("let",TokenConstants.LET);
  keywordsTokenConstants.put("loop",TokenConstants.LOOP);
  keywordsTokenConstants.put("pool",TokenConstants.POOL);
  keywordsTokenConstants.put("then",TokenConstants.THEN);
  keywordsTokenConstants.put("while",TokenConstants.WHILE);
  keywordsTokenConstants.put("case",TokenConstants.CASE);
  keywordsTokenConstants.put("esac",TokenConstants.ESAC);
  keywordsTokenConstants.put("new",TokenConstants.NEW);
  keywordsTokenConstants.put("of",TokenConstants.OF);
  keywordsTokenConstants.put("not",TokenConstants.NOT);
 }
 
 private int ch; //last read char
 private StringBuilder sb = new StringBuilder(); //buffer for look ahead characters
 
 //Main work-horse called by client code to get COOL
 //token
 public Symbol getNextToken() throws IOException {
  
  //get net char, skip the whitespace characters
  for(ch = getNextChar(); isWhitespaceChar(ch); ch = getNextChar()) {
   if(ch == '\n')
    currLineNo++;
  }
  
  if(isEOF(ch))
   return new Symbol(TokenConstants.EOF);
  
  if(isDigit(ch)) {
   return getIntegerToken();
  } else if(isLetter(ch)) {
   return getIdentifierOrKeywordToken();
  } else if(ch == '"') {
   return getStringToken();
  } else if(ch == '-') {
   int tmp = getNextChar();
   if(tmp == '-') {
    skipLineComment();
    return getNextToken(); //TODO: should use while loop, no tail-recursion
   } else {
    appendToLookaheadBuffer(tmp);
    return new Symbol(TokenConstants.MINUS);
   }
  } else if(ch == '(') {
   int tmp = getNextChar();
   if(tmp == '*') {
    Symbol err = skipBlockComment();
    if(err != null)
     return err;
    else
     return getNextToken();
   } else {
    appendToLookaheadBuffer(tmp);
    return new Symbol(TokenConstants.LPAREN);
   }
  } else if(ch == '<') {
   int tmp = getNextChar();
   if(tmp == '=') {
    return new Symbol(TokenConstants.LE);
   } else if(tmp == '-') {
    return new Symbol(TokenConstants.ASSIGN);
   } else {
    appendToLookaheadBuffer(tmp);
    return new Symbol(TokenConstants.LT);
   }
  } else if(ch == '=') {
   int tmp = getNextChar();
   if(tmp == '>') {
    return new Symbol(TokenConstants.DARROW);
   } else {
    appendToLookaheadBuffer(tmp);
    return new Symbol(TokenConstants.EQ);
   }
  } else if(ch == '*') {
   int tmp = getNextChar();
   if(tmp == ')') {
    return new Symbol(TokenConstants.ERROR, "Unmatched *)");
   } else {
    appendToLookaheadBuffer(tmp);
    return new Symbol(TokenConstants.MULT);
   }
  } else if(ch == ';') {
   return new Symbol(TokenConstants.SEMI);
  } else if(ch == ')') {
   return new Symbol(TokenConstants.RPAREN);
  } else if(ch == ',') {
   return new Symbol(TokenConstants.COMMA);
  } else if(ch == '/') {
   return new Symbol(TokenConstants.DIV);
  } else if(ch == '+') {
   return new Symbol(TokenConstants.PLUS);
  } else if(ch == '.') {
   return new Symbol(TokenConstants.DOT);
  } else if(ch == ':') {
   return new Symbol(TokenConstants.COLON);
  } else if(ch == '~') {
   return new Symbol(TokenConstants.NEG);
  } else if(ch == '{') {
   return new Symbol(TokenConstants.LBRACE);
  } else if(ch == '}') {
   return new Symbol(TokenConstants.RBRACE);
  } else if(ch == '@') {
   return new Symbol(TokenConstants.AT);
  } else {
   return new Symbol(TokenConstants.ERROR, Character.toString((char)ch));
  }
 }
 
 private Symbol getIntegerToken() throws IOException {
  StringBuilder buff = new StringBuilder();
  buff.append((char)ch);
  
  ch = getNextChar();
  while(isDigit(ch)) {
   buff.append((char)ch);
   ch = getNextChar();
  }

  appendToLookaheadBuffer(ch);
  
  return new Symbol(TokenConstants.INT_CONST,
    AbstractTable.inttable.addString(buff.toString()));
 }
 
 private Symbol getIdentifierOrKeywordToken() throws IOException {
  StringBuilder buff = new StringBuilder();
  buff.append((char)ch);
  
  ch = getNextChar();
  while(isLetter(ch) || isDigit(ch) || ch == '_') {
   buff.append((char)ch);
   ch = getNextChar();
  }
  
  appendToLookaheadBuffer(ch);
  
  String lexeme = buff.toString();
  
  //first see if lexeme is a keyword
  //they are case-insensitive
  String s = lexeme.toLowerCase(); 
  if(keywordsTokenConstants.containsKey(s))
   return new Symbol(keywordsTokenConstants.get(s));
  
  //see if it is true/false
  //first char has to be lower case, rest is case insensitive
  if(buff.charAt(0) == 't' && buff.length() == 4 && "rue".equalsIgnoreCase(buff.substring(1))) {
   return new Symbol(TokenConstants.BOOL_CONST,Boolean.valueOf(true));
  } else if(buff.charAt(0) == 'f' && buff.length() == 5 && "alse".equalsIgnoreCase(buff.substring(1))) {
   return new Symbol(TokenConstants.BOOL_CONST,Boolean.valueOf(false));
  }
  
  //otherwise its a Typeid or Objectid depending upon the case of
  //first char
  if(Character.isUpperCase(buff.charAt(0))) {
   //Typeid
   return new Symbol(TokenConstants.TYPEID,AbstractTable.idtable.addString(lexeme));
  } else {
   return new Symbol(TokenConstants.OBJECTID,AbstractTable.idtable.addString(lexeme));
  }
 }
 
 private Symbol getStringToken() throws IOException {
  int maxLength = 1024;
  StringBuilder buff = new StringBuilder();
  
  boolean escaped = false;
  boolean containsNull = false;
  boolean tooLong = false;
  
  while(true) {
   ch = getNextChar();

   if(isEOF(ch))
    return new Symbol(TokenConstants.ERROR,"EOF in string constant");
  
   if(escaped) {
    if(ch == 'b')
     buff.append('\b');
    else if(ch == 't')
     buff.append('\t');
    else if(ch == 'n')
     buff.append('\n');
    else if(ch == 'f')
     buff.append('\f');
    else if(ch == '\0')
     containsNull = true;
    else {
     buff.append((char)ch);
    }
    
    if(ch == '\n')
     currLineNo++;
    
    escaped = false;
   } else {
    if(ch == '\\')
     escaped = true;
    else if(ch == '\n') {
     currLineNo++;
     return new Symbol(TokenConstants.ERROR,"Unterminated string constant");
    } else if(ch == '\0')
     containsNull = true;
    else if(ch == '"') {
     //terminate
     break;
    } else {
     buff.append((char)ch);
    }
   }
   
   if(buff.length() > maxLength) {
    tooLong = true;
    buff.setLength(0);
   }
  }
  
  if(containsNull)
   return new Symbol(TokenConstants.ERROR,"String contains null character.");
  else if(tooLong)
   return new Symbol(TokenConstants.ERROR,"String constant too long");
  else
   return new Symbol(TokenConstants.STR_CONST,AbstractTable.stringtable.addString(buff.toString()));
 }
 
 private void skipLineComment() throws IOException {
  ch = getNextChar();
  while(ch != '\n' && !isEOF(ch)) {
   ch = getNextChar();
  }
  
  appendToLookaheadBuffer(ch);
 }
 
 //returns error token if comment is incomplete or else
 //return null
 private Symbol skipBlockComment() throws IOException {
  int blockCommentOpenCount = 1;
  while(blockCommentOpenCount > 0) {
   ch = getNextChar();
   if(ch == '(') {
    int tmp = getNextChar();
    if(tmp == '*')
     blockCommentOpenCount++;
    else {
     appendToLookaheadBuffer(tmp);
    }
   } else if(ch == '*') {
    int tmp = getNextChar();
    if(tmp == ')')
     blockCommentOpenCount--;
    else {
     appendToLookaheadBuffer(tmp);
    }
   } else if(ch == '\n') {
    currLineNo++;
   } else if(isEOF(ch)) {
    return new Symbol(TokenConstants.ERROR,"EOF in comment");
   }
  }
  return null;
 }

 //utilities to read data from stream or buffer if any lookaheads happened
 private int getNextChar() throws IOException {
  if(sb.length() > 0) {
   char c = sb.charAt(0);
   sb.deleteCharAt(0);
   return c;
  } else {
   return stream.read();
  }
 }
 
 private void appendToLookaheadBuffer(int ch) {
  if(!isEOF(ch))
   sb.append((char)ch);
 }
 
 private boolean isEOF(int c) {
  return c < 0;
 }
 
 private boolean isDigit(int c) {
  return Character.isDigit(c);
 }
 
 private boolean isLetter(int c) {
  return Character.isUpperCase(c) || Character.isLowerCase(c);
 }
 
 private boolean isWhitespaceChar(int c) {
  return c == 32 //space
   || c == 10 //newline
   || c == 12 //form feed
   || c == 13 //carriage return
   || c == 9 //tab
   || c == 11; //vertical tab
 }
 
 public int getCurrLineno() {
  return currLineNo;
 }
 
 
}

Tuesday, August 14, 2012

easy deadlocking in java

Traced down a stupid dead lock in an application today(thank god, jstack exists), I never realized it was so easy to produce a dead lock with *one* thread.

Look at the following code...

public class Main {

    public static void main(String[] args) throws Exception {
        
        ReentrantReadWriteLock lock = new ReentrantReadWriteLock();
        ReadLock rlock = lock.readLock();
        WriteLock wlock = lock.writeLock();
        
        try {
            System.out.println("Aquiring read lock...");
            rlock.lock();
            System.out.println("Aquiring write lock...");
            //gets blocked here
            wlock.lock();
            System.out.println("Got write lock as well");
        } finally {
            wlock.unlock();
            rlock.unlock();
        }
        System.out.println("Finished.");
    }
}
Above code gets blocked at wlock.lock() as read lock can not be upgraded to write lock.

Whats worse is that other threads will now block even to acquire a read lock because main thread is waiting to acquire a write lock. Essentially, with all likelihood, your whole application will stop working ;).

 Here is the code demonstrating that other thread will block even for a read lock when nobody really has a write lock(and this behavior is implemented to save the thread, waiting to acquire write lock, from starving).
public class Main {

    public static void main(String[] args) throws Exception {
        
        ReentrantReadWriteLock lock = new ReentrantReadWriteLock();
        ReadLock rlock = lock.readLock();
        WriteLock wlock = lock.writeLock();
        
        try {
            System.out.println("Aquiring read lock...");
            rlock.lock();
            
            tryAcquiringReadLockInAnotherThread(rlock);
            System.out.println("Aquiring write lock...");

            //gets blocked here
            wlock.lock();
            System.out.println("Got write lock as well");
        } finally {
            wlock.unlock();
            rlock.unlock();
        }
        System.out.println("Finished.");
    }
    
    private static void tryAcquiringReadLockInAnotherThread(final ReadLock rlock) {
        Thread t = new Thread(new Runnable() {
            @Override
            public void run() {
                try {
                    Thread.sleep(1000);
                    System.out.println("Trying to aquire read lock in other thread...");
                    //gets blocked here
                    rlock.lock();
                    System.out.println("Acquired read lock in other thread.");
                } catch(InterruptedException ex) {
                    //do not do this in real program :)
                    ex.printStackTrace();
                }finally {
                    rlock.unlock();
                }
            }
        });
        t.start();
    }
}

I tried it on following java version..
$ java -version
java version "1.6.0_30"
Java(TM) SE Runtime Environment (build 1.6.0_30-b12)
Java HotSpot(TM) 64-Bit Server VM (build 20.5-b03, mixed mode)
Ref: ReentrantReadWriteLock

Saturday, July 14, 2012

Assembly Code Generation - part#4

This is the 4th post in the series of assembly code generation.

Part - I
Part - II
Part - III

In this post, I will try to describe how a method definition and dispatch might be translated to assembly language.

Methods also define a local "scope". Any global variables can be overriden in this scope and new ones(called local variables) can be defined here. Typically whenever a method call is made, we put a specific structure called "stack frame"(or "activation record") in the memory. In the "activation record" method parameters, local variables, return address etc are kept at known positions. Typically parameters and local variable values are kept at fixed offsets from a know position called the "frame pointer" in the activation record.

One of the main task while emitting code for method definition or dispatch is to design the strcuture of your activation record. Typically method dispatch fills part of the activation record and remaining is filled by the code generated by method definition.


We will use register \$fp for frame pointer and \$ra for return address, to hold them whenever required.

At this point I will introduce a few more invariants..

1. Inside a method register \$s0 always has the address to self object .


So, here is the structure of my activation record.

-------------------------
argument # n
-------------------------
argument # n-1
-------------------------
..
..
argument # 1
------------------------- <-- I keep \$fp to have this location
fixed space reserved
..
..
for local variables
-------------------------
return-address
-------------------------

One more thing we need to understand is the structure of something called, a "dispatch table". Remember, in part-III of this series, I described the structure of the prototype objects, which keep a pointer, dispatch table pointer, at offset 8.
The dispatch table is nothing but a list of all the methods visible(defined in the class and the ones defined in the parent and its parent and so on.) in the class of the prototype object.

Let us look at one method table...

class A inherits Object {

      foo(x:Int, y:Int): Int {
                 ..
      };

      --overriding copy
      copy():SELF {
                  ..
      }
     
}

Generate method table..

A_dispTab:
  .word  Object.abort
  .word  Object.type_name
  .word  A.copy
  .word  A.foo

Notice the ordering, they are listed from super type to the base type in the order of their definition. Notice A.copy appears before A.foo because copy() is defined in base class Object, before foo(..) is defined in A. Compiler will generate dispatch tables like this for all the classes defined in the program. And labels like A.foo are generated where we generate the code for method definition for foo in A.


Let us see how a method dispatch might translate to assembly...

Original code..
x.foo(param1,param2);

Assembly code generated...

#push all the argument to the stack..

  #generate code to evaluate param2
  #that should put param2 result in \$a0
  cgen(param2)
  sw    \$a0     0(\$sp)
  addiu \$sp     \$sp     -4

  #generate code to evaluate param1
  #that should put param1 result in \$a0
  cgen(param1)
  sw    \$a0     0(\$sp)
  addiu \$sp     \$sp     -4

  #emit code to evaluate x from x.foo(..) that
  #should put x evaluation result object pointer
  #in \$a0
  cgen(x)
 
  #after pushing the arguments in memory
  #locate the label for method foo and jump
  #there

  #Object returned by x will have dispatch table pointer
  #located at offset 8, in the dispatch table label A.foo can
  #be found at a fixed offset known at compile time
  #here we just jump to that location
 

Let us now see, how the method definition for A.foo translates to assembly..

#First the label is generated
A.foo:
  #caller has pushed the arguments on stack
  #store location of current stack pointer
  #in the frame pointer
  move    \$fp   \$sp
 
  #evaluate at compile time, how much
  #space you'll need for local variables
  #or temporaries and reserve it
  addiu    \$sp  \$sp 

  #generate code to evaluate method body
  cgen(body)

  #in the method body, arguments and locals
  #can be looked at from compile time known
  #offsets from frame pointer


  #load value of return address from stack frame
  #to register \$ra and jump there
  jump \$ra


Finally, for anyone reading these posts, I will highly recommend to take the online compiler class from coursera. And, to really learn it, you *HAVE TO* finish all the programming assignments.

Saturday, July 7, 2012

Assembly Code Generation - part#3

This is the 3rd post in the series of assembly code generation.

Part - I
Part - II

In this post, I will try to describe how an object oriented language might implement the "new" operator for creating new instances of some class.

I will describe here how the COOL compiler that I wrote during the compiler course worked.

Some trivia about inheritance in COOL language: A class Foo can inherit from another class Bar, all the global attributes present in Bar are also visible in Foo and can not be redefined. However, methods defined in Bar, also visible in Foo,  can be overwritten in Foo.

New object creation works by creating clone of a "prototype object" for that type. COOL compiler generated code lays out one prototype object for each type defined in the program being compiled(which may contain multiple class definitions) and at runtime new objects for a class are created by cloning the prototype object for that class.

Here is how a COOL object is laid out in the memory..

----------------------- offset = 0
class-tag

----------------------- offset = 4
total-object-size

----------------------- offset = 8
ptr-to-dispatch-table

----------------------- offset = 12
inherited-attr-1

-----------------------
inherited-attr-2

-----------------------
..
-----------------------       
attribute-1

-----------------------
attribute-2

-----------------------
..

-----------------------


1st 4 bytes contain a unique integer tag assigned to this class by the compiler. This identifies the class of the object and used in various places, for example while checking object equality or to see if two objects are of same type or not.
Next 4 bytes contain the total size of this object.
Next 4 bytes contain a pointer to the dispatch table(a table of methods defined in this class and its parents, we will talk more about this in a separate post)

Remaining bytes contain all the attributes, including inherited. Let say the class hierarchy is..

B inherits A
C inherits B,

Basically A is on top in the hierarchy and C is in the bottom. Then C's prototype object will first contain all the attributes of A, then those of B and then those defined in C itself.

Here are some of the things you should notice about this object layout.

- Object is laid out in contiguous memory.

- The offset of an attribute remains same in a class and all of its subclasses because of the way we order attributes in the object.
This kind of layout basically lets the subclass extend the layout of base class than changing it fundamentally. Because of this fact it is simple to retrieve value of an attribute from a fixed offset in the object without knowing actual concrete dynamic type of the object at runtime.

Let us see the prototype objects generated for a simple hierarchy in COOL.

class A inherits Object {
      x:Int;
};

class B inherits A {
      y:Bool;
};

Code generated will look something like following...

Object_protObj:     #label to refer to this object    
    .word    0   #write word 0, class tag of Object class, to memory
    .word    3   #write size of this object in memory words
    .word    Object_dispTab  #write address of dispatch table of Object type in 1 word of memory
A_protObj:
    .word    1
    .word    4
    .word    A_dispTab
    .word    int_const0      #default value of x, pointer to integer object 0
B_protObj:
    .word    2
    .word    5
    .word    B_dispTab
    .word    int_const0      #default value of x, pointer to integer object 0
    .word   bool_const0      #default value of y, pointer to boolean object false


Now we are ready to understand the code generated for expression, new A.

cgen(new A)

  #load address of label A_protObj in register \$a0
  la \$t1 A_protObj
 
  #emit instructions to copy the
  #object at address \$t1, and to put
  #address to newly cloned object in \$a0


And you're done, new object of type A is created and pointer to it is placed in \$a0  :).

BONUS Reading:
COOL supports SELF TYPEs too.
Basically when we execute x.someMethod(..), Inside the definition of someMethod, there is a variable visible(called "self" in COOL and "this" in java) that refers to the object referenced by x at runtime. new SELFTYPE is supposed to return the object of the type of the one referenced by "self".

At this point, I should declare one more invariant. Code generated for method call/dispatch always ensures that register \$s0 has the pointer to "self" object.

To support, new SELFTYPE, COOL Compiler always generates a label called Class_objTab that has pointers to all the prototype objects in order of their class tags. So, for our example mentioned above, that label will look something like following..

class_objTab:   #the class_objTab label
    .word    Object_protObj    #first pointer to Object_protObj, as its class tag is 0
    .word    A_protObj         #next is A as its class tag is 1
    .word    B_protObj         #next is B as its class tag is 2

Now we are ready to see the code generated for, new SELFTYPE

cgen(new SELFTYPE)

         #load the address of label class_objTab in
         #temporary register \$t1
         la     \$t1     class_objTab

         #load the integer class-tag of self object
         #referenced by \$s0, class-tag is stored at
         #offset 0
         #class-tag is stored in temp register \$t2
         lw     \$t2     0(\$s0)

         #class_objTab contains the prototype object pointer
         #at offset class-tag of the type, so we add class-tag
         #stored in \$t2 to \$t1 get address of prototype object
         #of self object
         addu   \$t1     \$t1     \$t2

         #at this point \$t1 has the pointer to prototype object
         #of self object's type
         #we can emit code that copies the prototype object and
         #puts the pointer in \$a0
        

Assembly Code Generation - part#2

This is 2nd post in the series of assembly code generation.

Part - I

In this post, I am writing the possible assembly code generated from a typical if expression.

cgen(if e1 == e2 then e3 else e4)

  #generate code for e1 that will put
  #e1 evaluation in \$a0
  cgen(e1)
  sw \$a0 0(\$sp) #push the result to stack
  addiu \$sp \$sp 4

  #generate code for e2 evaluation, this will
  #will put result of e2 evaluation in \$a0
  cgen(e2)

  #load the result of e1 evaluation
  #from stack in temp register \$t1
  lw \$t1 4(\$sp)
  addiu \$sp \$sp 4

  #check if \$a0 and \$t1 are equal, jump to
  #label true_branch if they are equal or else
  #continue
  beq \$a0 \$t1 true_branch

  #we come to this this point only if value of
  #e1 and e2 evaluation were different, here
  #we generate code for else case
  cgen(e4)

  #after code for else branch, unconditionally jump  to label
  #endif which is the label generated in the
  #end
  jumpto endif

  #true_branch label, we come here if e1 and e2 evaluated
  #to same value
  true_branch:
  cgen(e3)

  #the label endif
  endif:

  #code beyond the if expression follows...

Friday, July 6, 2012

Assembly Code Generation - part#1

I recently finished doing the Compiler course from Coursera. In this series of posts I am trying to take some notes explaining how high level programming language expressions might be translated to assembly code. They are not accurate descriptions but more to get the idea.

In general, on any machine, you have a few registers and memory allocated to your process. Initially, execution of a program is under the control of the OS. When the process is started, OS allocates memory to the process and jumps to the entry point(e.g. "main"). Memory(from here on, memory means the memory allocated to your process) is typically divided in 2 sections, namely code and data area. Your instructions are stored in code area while the data is stored in the data area. It is responsibility of the compiler to generate code and orchestrate data area.

Usually, assembly code is generated by recursively traversing the AST. Assume every node in the AST implements a function called cgen() that is responsible for generating assembly code for the expression for that node in the AST.

In this post I will explain how a "+" expression might be implemented.

In general, when we generate code, we need to have some invariants so that various expression's generated code doesn't modify the memory or registers in an unexpected way.

For this post, following invariants are sufficient.

1. Any expression's generated assembly code puts the pointer to the result of the expression in accumlulator register, \$a0.
2. Register \$sp (stack pointer) always contains address of next free word where data can be written.
3. Any expression't generated code ensures that it preserves \$sp value that is at the end of expression evaluation code \$sp gets the same value back that it had when that expression's code execution started.


cgen(e1 + e2):

  #generate code to evaluate e1, this should
  #put the result of e1 evaluation in \$a0
  cgen(e1)

  #now that \$a0 has value of e1 evaluation, let us
  #store it on the stack
  sw \$a0 0(\$sp)
  addiu \$sp \$sp -4 #decreasing stack pointer as we "pushed" 4 bytes of data

  #now generate code to evaluate e2, that should
  #put the result of e2 evaluation in \$a0
  cgen(e2)

  #load the value of e1 evaluation in a temporary register \$t1
  lw \$t1 4(\$sp)
  addiu \$sp \$sp 4  #increasing stack pointer as we "popped" 4 bytes of data
  add \$a0 \$a0 \$t1  #add the values in \$a0 and \$t1, put the result in \$a0

  #finally at this point \$a0 holds the sum of results of e1 and e2 as required

Thursday, July 5, 2012

Finished Coursera Compiler course

Today I gave the final exam for compiler course and managed to get a decent score.

Course website says, "This course will discuss the major ideas used today in the implementation of programming language compilers, including lexical analysis, parsing, syntax-directed translation, abstract syntax trees, types and type checking, intermediate languages, dataflow analysis, program optimization, code generation, and runtime systems". And, the course was really able to cover the said topics in decent detail.

But, real learning of the course was not in the videos or quizzes or exams. It was in the optional project, where you were expected to code 4 major phases of a compiler namely lexical analysis, parsing, semantic analysis and assembly code generation. So, essentially, I wrote a fully functional compiler for COOL language that has many features found in Java and C++.

Programming assignment#1 was to write the lexical analyzer for COOL, which will take a COOL program and produce the Tokens. We were expected to use lexer generator, JLex, where you can give your token specifications using regexps and java code that creates required token on regex match. Though lectures taught you how actually regexes can be implemented by converting them to NFAs, which can be simulated directly or can be converted to DFAs and can have a table driven implementation, but use of JLex did not let me code that. Because of time pressure I could only do the assignment with JLex. I would like it even more if assignment is modeled in a way so that you don't use JLex but code the regex implementation by hand.

Programming assignment#2 was to write the parser that would generate the AST from the tokens returned by lexer from previous assignment. Again, we used a parser generator called Java CUP, that would generate the parser given the CFG grammar specification with associativity and precedence rules.Though you learn the theory of parsing(from lecture videos and readings), but assignment does not really need you to hand code one. I would like it even more if I hand code the parser as this is an academic exercise(however, I have earlier written a recursive-descent parser).

The fun part begins now..

Programming assignment#3 is when you have no tools. You have an AST and need to hand code all the semantic rules of the language. Most of the code you write here is to do static type checking. You traverse the whole AST, I used visitor pattern, at every node(which are different kind of expressions supported by the language, for example method dispatch, if expression, case expression, assignment etc). You ensure that types declared and inferred from the expression are in agreement with the type rules defined in the language. COOL supports SELF TYPES and that adds to the type checker complexity.

Programming assignment#4 gets even better. After you're done with compile time semantic rules check, you generate MIPS assembly code for the given COOL program. This is the place where you become one with the machine. Here you have to carefully convert all the high level expressions to assembly code. You never realize while coding in a high level language that when it comes to assembly then processor, mostly, only knows how to go about blindly executing the instruction sequence laid out in memory and occasionally make jumps to other memory addresses. It is just an eye opener to learn the tricks of translating high level language constructs to simple load, move, jump and branch instructions with few registers and memory.

While doing these assignment, I had to spend a lot of time with paper and pen to think hard and form a solution.. for example how and what should go in a stack frame when a method is called, how you locate its correct implementation and jump back to the return address after completion.
Another eye opener was that, once the assembly code is generated, then there are no "identifiers", all you have is the memory addresses in the form of labels and offsets to locations in your stack frame :).

Another side thing I noticed is that It is an essential skill to draw yourself away from the laptop, think in isolation and be able to write code on paper in a not really compilable version of your choice of implementation language.

Besides keeping me super busy outside day job, This compiler project has enlightened me. And, I am really really thankful to coursera. Having done this compiler for a statically typed language(and a interpreter for a lisp language, Scheme), after so many years of coding... Now, I feel like, I can "see through" the languages. And, The feeling is just amazing.