However, I needed to automate the whole process in the code and certainly it is beyond me to look "inside" photoshop to see how it works(what are the algorithms/transformations etc and their implementations).
Anyway, from the article above it became clear that pseudocode looks like following:
s = Read-File-Into-Image("/path/to/image")
g = Convert-To-Gray-Scale(s)
i = Invert-Colors(g)
b = Apply-Gaussian-Blur(i)
result = Color-Dodge-Blend-Merge(b,g)
Now it was a matter of finding open source image-processing library that provided the operations I needed. By googling, I landed on JH Labs. They, freely, provide an image editor on which I tried to replicate the process described in photoshop article mentioned above and indeed I got the pencil sketch effect. Now, the best part is that image processing library behind JH Labs image editor is open source.
Then it was just a matter of coding the pseudocode using the JH labs library and here it is...
BufferedImage src = null;
BufferedImage target = null;
src = ImageIO.read(new File("C:\\tmp\\ss.png"));
src = ImageUtils.convertImageToARGB(src);

//transformations begin=============
//gray scale
PointFilter grayScaleFilter = new GrayscaleFilter();
BufferedImage grayScale = new BufferedImage(src.getWidth(),src.getHeight(),src.getType());
grayScaleFilter.filter(src, grayScale);

//inverted gray scale
BufferedImage inverted = new BufferedImage(src.getWidth(),src.getHeight(),src.getType());
PointFilter invertFilter = new InvertFilter();
invertFilter.filter(grayScale,inverted);

//gaussian blurr
GaussianFilter gaussianFilter = new GaussianFilter(20);
BufferedImage gaussianFiltered = new BufferedImage(src.getWidth(),src.getHeight(),src.getType());
gaussianFilter.filter(inverted, gaussianFiltered);

//color dodge
ColorDodgeComposite cdc = new ColorDodgeComposite(1.0f);
CompositeContext cc = cdc.createContext(inverted.getColorModel(), grayScale.getColorModel(), null);
Raster invertedR = gaussianFiltered.getRaster();
Raster grayScaleR = grayScale.getRaster();
BufferedImage composite = new BufferedImage(src.getWidth(),src.getHeight(),src.getType());
WritableRaster colorDodgedR = composite.getRaster();
cc.compose(invertedR, grayScaleR , colorDodgedR);

//==================================
target = composite;
File outputfile = new File("C:\\tmp\\saved.png");
ImageIO.write(target, "png", outputfile);
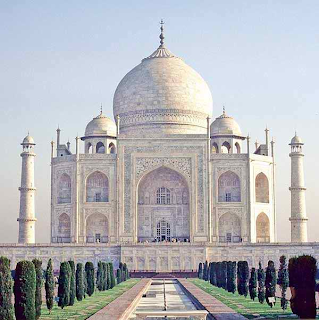
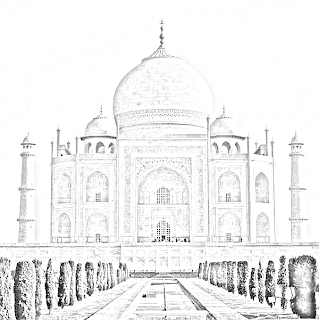
Here is how the image transform when I apply above code...


Notes:
- I used above code on png images. JH Labs code only works with TYPE_INT_ARGB(ref) images so you might need to transform them correctly.
- Code shown above was written to just check the concept and has no regards for performance, beauty.
Acknowledgement:
Well, to be honest, from being a alien to image-processing to getting to the code was not as linear a process as described in this post and I had to do a lot of hit n trial to get to this point. I want to thank Jerry who patiently answered my queries.

Thanks for this good article. How can we color the image result in java like the PhotoShop Tutorial?
ReplyDeleteas the tutorial describes, you take the original colored image, adjust its opacity and merge/compose it with the sketched image using the "color"(use com.jhlabs.composite.ColorComposite.java) blend mode.
ReplyDeleteI have tried with this code but the result is not the same with the tutorial how can i fix that?
ReplyDeleteColorComposite colorComposite = new ColorComposite(0.5f);
CompositeContext cc3 = colorComposite.createContext(src.getColorModel(), composite.getColorModel(), null);
BufferedImage compositeFinal = new BufferedImage(src.getWidth(),src.getHeight(),src.getType());
WritableRaster colorFinal = compositeFinal.getRaster();
cc3.compose(cartoonR, colorDodgedR, colorFinal);
above code is not adjusting the source image opacity, that seems to be the problem.
ReplyDeleteUse
OpacityFilter opacityFilter = new OpacityFilter(75);
to make original image semi transparent and then use new ColorComposite(1.0f) on it with the sketched version.
Can u provide full code with jar file?
ReplyDeletehow to use for median filter?
ReplyDelete